TypeORM Migrations for NestJS
20 May 2022Table of Contents
Introduction
When building out a web application, it's easy to neglect database process management as something to be done "later".
Then you start bringing in other devs, start maintaining dev, staging and production environments and you quickly come to understand the full value of proper database scheme management processes.
That's the very reason I'm writing this post, after all!
Below follows my notes to manage migrations using TypeORM within a vanilla NestJS application.
Migrations
Object-relational mapping was popularised by frameworks like Rails and Django, as a means to better process schema changes to database/schema migration, much like Git offers for codebases.
The advantage comes from authoring migrations as code, so as to be able to track changes between states in version control. Much like Git tracks code and Redux can track state, ORM migrations can be leveraged to "step through time" as we change our database.
Get Started
# Create new NestJS app
nest new nestjs-migrations-seeding

# Create new Users with CRUD entry points
nest g resource users
The NestJS documents only offer a couple of paragraphs on what quickly proves to be an essential requirement for any application.
We get handed off to the TypeORM documentation and introduced to the TypeORM CLI.
# Install dependencies for TypeORM, Postgres
npm i @nestjs/typeorm [email protected] pg class-validator class-transformer @nestjs/config

# Install types
npm i -D @types/node
It's important to note that TypeORM CLI only deals with vanilla JavaScript and not TypeScript. This means that we must compile any TypeScript we author within the app, before operating on it with TypeORM CLI.
We can leverage NPM scripts to configure part of this complexity away:
"scripts": {
    ...
    "typeorm:cli": "node --require ts-node/register ./node_modules/typeorm/cli.js"
}
You can set and forget this, but understand that ts-node/register hooks in the TypeScript compilation as a preprocess of our desired JavaScript file management with typeorm/cli.js.
We'll be back later to flesh out our scripts with better understanding.
TypeORM Connection
Time to configure the connection between NestJS and TypeORM and our Postgres database. Create a new file as below:
import { ConfigModule, ConfigService } from '@nestjs/config';
import {
  TypeOrmModuleAsyncOptions,
  TypeOrmModuleOptions,
} from '@nestjs/typeorm';

export const typeOrmAsyncConfig: TypeOrmModuleAsyncOptions = {
  imports: [ConfigModule],
  inject: [ConfigService],
  useFactory: async (): Promise<TypeOrmModuleOptions> => {
    return {
      type: 'postgres',
      host: process.env.DATABASE_HOST,
      port: Number(process.env.DATABASE_PORT) || 5432,
      database: process.env.DATABASE_NAME,
      username: process.env.DATABASE_USER,
      password: process.env.DATABASE_USER,
      synchronize: false,
      logging: true,
    };
  },
};
It's important to note that this setup is different from the standard NestJS configuration.
The difference is necessary because TypeORM CLI is later required for running migrations and seeding data, however it cannot parse any of the TypeScript decorations or Nest async operations offered by: TypeOrmModule.forRootAsync().
So what does our setup achieve instead?
The key requirement is that two configurations must be maintained here. One for the NestJS application connection to Postgres, and one for TypeORM CLI tool to operate with.
First of all we're importing the configuration module and service from NestJS to allow us to process .env files with Nest's preconfigured dotenv package.
The TypeOrmModuleAsyncOptions type gives us a useFactory() property that handles the asynchronous fetch of our configuration object into our base Application Module at startup. While you may question the immediate necessity for this as the .env file is stored in our codebase, later usage of secret management libraries necessitate a round trip to third party services.
The function returns a Promise<TypeOrmModuleOptions> which we can populate with our database connection details, including type, host, database, username and password.
Startup
With this configuration in place, we need to import our typeOrmAsyncConfig const for use in our primary application module at startup:
import { Module } from '@nestjs/common';
import { ConfigModule } from '@nestjs/config';
import { TypeOrmModule } from '@nestjs/typeorm';
import { typeOrmAsyncConfig } from './config/typeorm.config';

import { AppController } from './app.controller';
import { AppService } from './app.service';

@Module({
  imports: [
    ConfigModule.forRoot({
      envFilePath: ['.env'],
      isGlobal: true,
      cache: true,
    }),

    TypeOrmModule.forRootAsync(typeOrmAsyncConfig),
  ],
  controllers: [AppController],
  providers: [AppService],
})
export class AppModule {}
Note that ConfigModule must be declared ahead of the TypeOrmModule, otherwise TypeORM will not be able to read the environment variables.
Check NestJS can connect to the database by starting the service:
npm run start:devIf everything went to plan, your terminal should log:
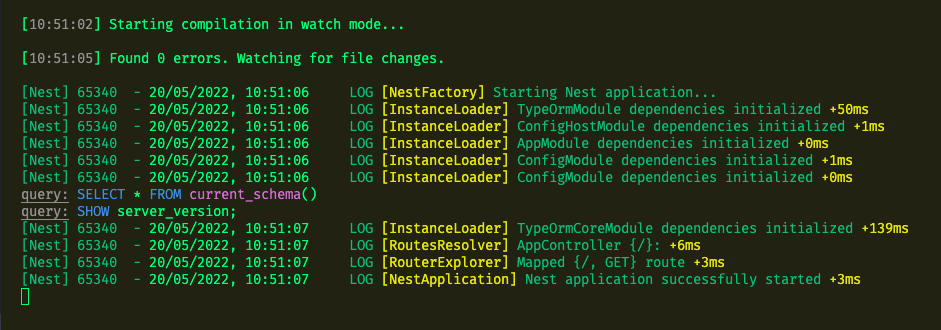
Cool!
Note how our logging: true configuration also presents an inline schema check: SELECT * FROM current_schema() -- we will see this greatly extended as we fold in some test entities.
Entity Configuration
Let's introduce a User entity into our system, so we can begin building our database schema:
nest g resource usersLeverage the NestJS CLI resource functionality to bootstrap a new User module, controller, service, entity, DTO and connections with a REST configuration. It will be imported to our root App module, following the TypeOrmModule dependancy.
With NestJS running in dev mode, we should see these new functionalities registered:

TypeOrm Entity
Let's author our User schema:
import { IsEmail } from 'class-validator';
import { Column, Entity, PrimaryGeneratedColumn } from 'typeorm';

@Entity()
export class User {
  @PrimaryGeneratedColumn('uuid')
  id: string;

  @Column('varchar', { unique: true, length: 256 })
  @IsEmail()
  email_address: string;

  @Column({ length: 256 })
  password: string;

  @Column('varchar', { nullable: true, length: 128 })
  first_name: string;

  @Column('varchar', { nullable: true, length: 128 })
  last_name: string;
}
We leverage TypeScript decorators to define our database columns, datatypes and validation.
NestJS DTO with Class Validator
While TypeORM and Postgres can manage the integrity of our data in storage, the purpose of Data Transfer Objects is to ensure type safety of data in transit.
This will afford us additional validation and error handling that is surfaced when we query our API endpoints, leveraging the class-validator package.
import { IsEmail, IsNotEmpty, IsOptional, IsString } from 'class-validator';

export class CreateUserDto {
  @IsNotEmpty()
  @IsEmail()
  readonly email_address: string;

  @IsNotEmpty()
  @IsString()
  readonly password: string;

  @IsOptional()
  @IsString()
  readonly first_name: string;

  @IsOptional()
  @IsString()
  readonly last_name: string;
}
The auto-generated update-user.dto.ts helps us later handle PATCH updates, by anticipating partial transmissions still in accordance with our principle complete schema.
Connect Entity to TypeORM
With the shape of our data in transit and at rest defined, we must now connect our Users module to our database via the TypeORM connection.
Back in our TypeORM configuration, let's ensure we can read our entity files, by defining the entities connection option:
useFactory: async (): Promise<TypeOrmModuleOptions> => {
  return {
    ...
    migrations: ['dist/migrations/**/*.js'],
    ...
  };
},
Recall that TypeORM will only deal with JavaScript and not TypeScript files, so we point it as our compiled dist directory.
Import the TypeOrmModule and our newly defined User entity to create the connection:
import { Module } from '@nestjs/common';
import { TypeOrmModule } from '@nestjs/typeorm';

import { UsersController } from './users.controller';
import { UsersService } from './users.service';
import { User } from './entities/user.entity';

@Module({
  imports: [TypeOrmModule.forFeature([User])],
  controllers: [UsersController],
  providers: [UsersService],
})
export class UsersModule {}
TypeORM Database Synchronization
With connections between the API and Postgres database made, you might be checking the table structure in your database and not seeing any user table. This is because we defaulted our typeorm.config.ts connection configuration with: synchronize: false.
Flip the value to true, and see your changes affect the Postgres table!
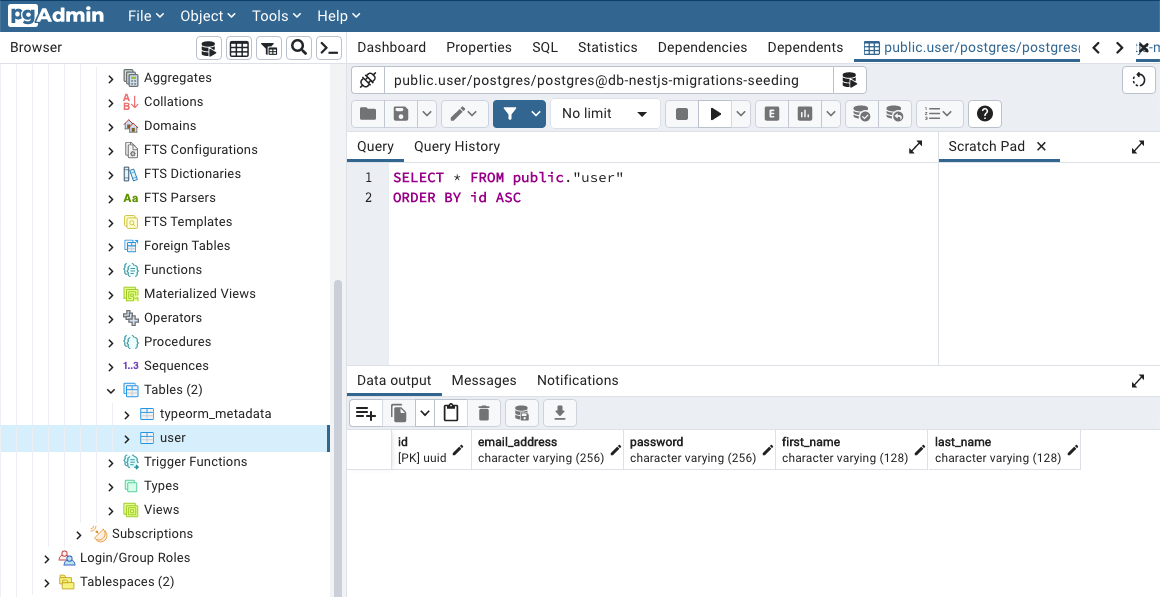
This value can be considered like a developer "watch mode" for writing our entity/table structures. While we are doing the major authoring of structure, this will refresh our tables as the NestJS service restarts, reflecting our changes in realtime.
While this is useful in getting started, this will later create problems as multiple developers begin collaborating and multiple databases must be maintained in different states at difference moments in time.
Hence the upcoming need for migrations!
TypeORM Logging
As you work on your Users service, you will see the extended logging of TypeORM. This is the SQL transpiled from our TypeScript *.entitiy.ts files that is being authored by TypeORM and written into the database upon each refresh of the NestJS dev runtime.
Neat.
Users Service
While not the focus of this tutorial, for completeness we can review a basic CRUD service for our User entity. Update the controller's function calls to match new naming for findOneById().
import {
  ConflictException,
  HttpStatus,
  Injectable,
  NotFoundException,
} from '@nestjs/common';
import { InjectRepository } from '@nestjs/typeorm';
import { getRepository, Repository } from 'typeorm';

import { CreateUserDto } from './dto/create-user.dto';
import { UpdateUserDto } from './dto/update-user.dto';
import { User } from './entities/user.entity';

@Injectable()
export class UsersService {
  constructor(
    @InjectRepository(User)
    private readonly userRepository: Repository<User>,
  ) {}

  // CREATE single User
  async create(createUserDto: CreateUserDto) {
    const existingUser = await this.userRepository.findOne({
      where: { email_address: createUserDto.email_address },
    });

    if (existingUser) {
      throw new ConflictException({
        status: HttpStatus.CONFLICT,
        error: `Email address "${createUserDto.email_address}" already registered.`,
        element: 'email',
      });
    }

    const newUser = this.userRepository.create(createUserDto);
    return this.userRepository.save(newUser);
  }

  // READ all Users
  findAll() {
    return this.userRepository.find();
  }

  // READ single User by ID
  async findOneById(id: string) {
    const user = await getRepository(User)
      .createQueryBuilder('user')
      .where('user.id = :id', { id: id })
      .getOne();

    if (!user) {
      throw new NotFoundException(`User #${id} not found`);
    }

    return user;
  }

  // UPDATE single User by ID
  async update(id: string, updateUserDto: UpdateUserDto) {
    const user = await this.userRepository.preload({
      id: id,
      ...updateUserDto,
    });
    if (!user) {
      throw new NotFoundException(`User #${id} not found`);
    }
    return this.userRepository.save(user);
  }

  // DELETE single User by ID
  async remove(id: string) {
    const user = await this.findOneById(id);
    return this.userRepository.remove(user);
  }
}
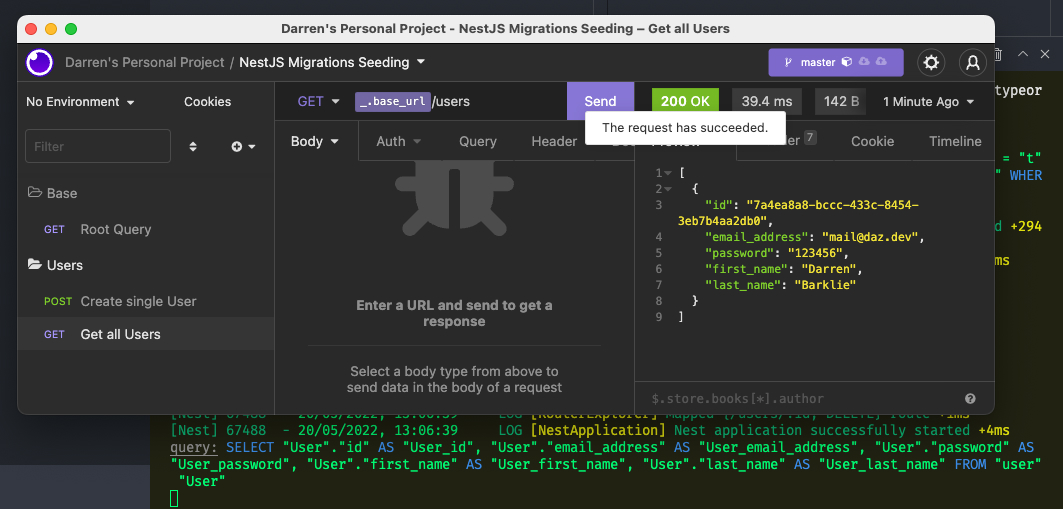
Querying our users, will log the SQL SELECT query and return any entries we've recorded.
Migrations
It's taken a while to get to this point, but I think this "ground up" understanding of how NestJS, TypeORM and Postgres fit together is valuable in understand our backend application.
With our API successfully connecting to our data store and tables set up, we can now assume that we're folding more developers into the project to work on their respective modules.
Time to flip that synchronize: true back to the false value and build a more robust workflow.
To simulate a fresh start (without synchronizing during our User entity build), go ahead and DROP the typeorm_meta and user tables.
TypeORM NestJS Config Update
First, we must extend our typeorm.config.ts setup, so that our application is aware of the migration system entities we will later author.
useFactory: async (): Promise<TypeOrmModuleOptions> => {
  return {
    ...
    entities: ['dist/**/*.entity.js'],
    migrations: ['dist/migrations/**/*.js'],
    cli: {
    migrationsDir: 'dist/database/migrations',
    },
    extra: {
      charset: 'utf8mb4_unicode_ci',
    },
    synchronize: false,
    logging: true,
  };
},
The migrations array tracks where to find the migration files we will soon create -- using a catchall globbing pattern (as we did with our entities setup).
The cli.migrationsDir option will point the TypeORM CLI tool to our migrations directory to collect and create migrations files to operate on.
The extra charset option leverages the utf8mb4 format over the default utf8, permitting emoji usage! ☀️
TypeORM CLI Connection
As alluded to in the first TypeORM chapter, we need two connection types. The first, which we have already established, is for our NestJS application.
The second is for our TypeORM migrations command line tool.
We author this below our initial typeOrmAsyncConfig const, matching the majority of the configuration structure, excluding the syncronize configuration, as it has no context to what TypeORM CLI does.
// NestJS Connection Config
export const typeOrmAsyncConfig: TypeOrmModuleAsyncOptions = {
  ...
}

// TypeORM Connection Config
export const typeOrmConfig: TypeOrmModuleOptions = {
  type: 'postgres',
  host: process.env.DB_HOST,
  port: parseInt(process.env.DB_PORT, 10),
  username: process.env.DB_USERNAME,
  database: process.env.DB_NAME,
  password: process.env.DB_PASSWORD,
  entities: ['dist/**/*.entity.js'],
  migrations: ['dist/migrations/**/*.js'],
  cli: {
    migrationsDir: 'dist/database/migrations',
  },
  extra: {
    charset: 'utf8mb4_unicode_ci',
  },
  logging: true,
};
We can now create an reference file that simply exports the typeORMConfig object to make it accessible for our base Node typeorm:cli script in package.json:
import { typeOrmConfig } from './typeorm.config';

export = typeOrmConfig;
Running TypeORM Migrations
Let's get working with the TypeORM CLI at last!
Check Configuration
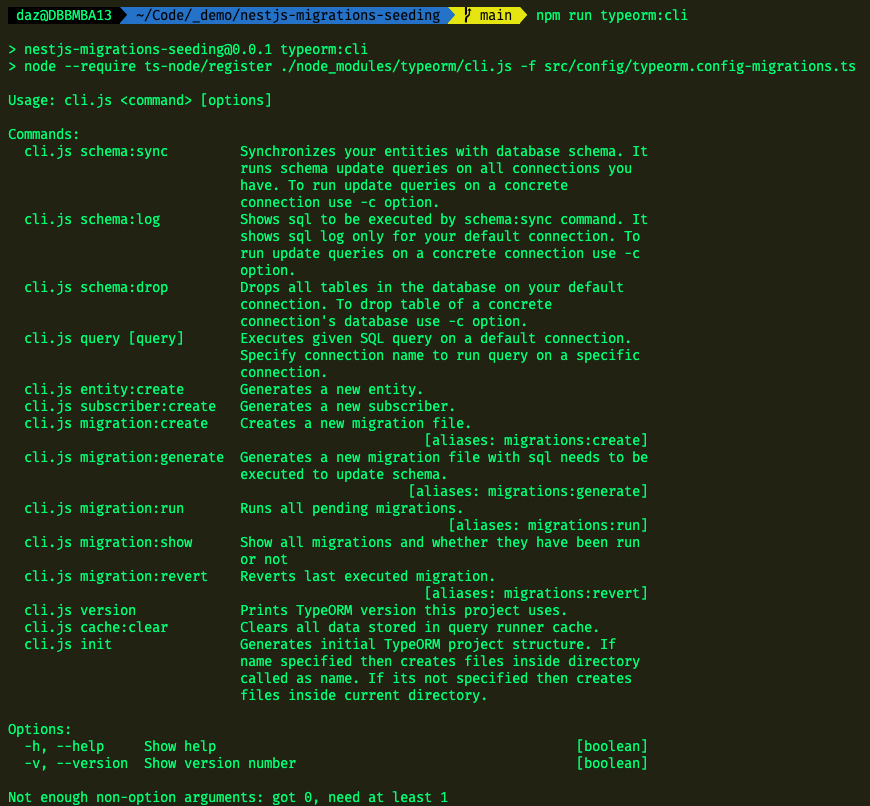
The first thing to do is check that TypeORM CLI is properly connecting to the database. Utilise the initial script that we wrote:
npm run typeorm:cliIf the tool is properly configured, you should see a return of commands we can use:
Show All Migrations
To ensure that the TypeORM tool can correctly connect to the database using our typeorm.config-migrations.ts export, run:
npm run typeorm:cli migration:showYou should see a response that lists some base SQL queries, such as:

Create Initial Migration
With our database in a "blank" starting condition, but our codebase containing the User entity, there are some changes that we can capture for tracking.
Run, where the final argument is a brief human-readable description of the database schema change:
npm run typeorm:cli -- migration:generate -d src/migrations -n AddUserYou should see a successful output:

You will also find that TypeORM CLI has now generated a migration file in a new migrations directory:
import { MigrationInterface, QueryRunner } from 'typeorm';

export class AddUser1653073056671 implements MigrationInterface {
  name = 'AddUser1653073056671';

  public async up(queryRunner: QueryRunner): Promise<void> {
    await queryRunner.query(
      `CREATE TABLE "user" ("id" uuid NOT NULL DEFAULT uuid_generate_v4(), "email_address" character varying(256) NOT NULL, "password" character varying(256) NOT NULL, "first_name" character varying(128), "last_name" character varying(128), "description" character varying(512), CONSTRAINT "UQ_a8979f71f59cb66a8b03bde38c1" UNIQUE ("email_address"), CONSTRAINT "PK_cace4a159ff9f2512dd42373760" PRIMARY KEY ("id"))`,
    );
  }

  public async down(queryRunner: QueryRunner): Promise<void> {
    await queryRunner.query(`DROP TABLE "user"`);
  }
}
This file implements MigrationInterface with our chosen name and Epoch Unix timestamp for uniqueness and chronological consistency. Two functions are generated:
up()captures the diffs from our previous state in transpiled SQL queriesdown()offers a "reversal" action, should we need to rollback
These migration files now afford us a deterministic approach to reproducing a consistent database schema, which can be checked into our source control repository and maintained across multiple contributing developers.
Run Migration
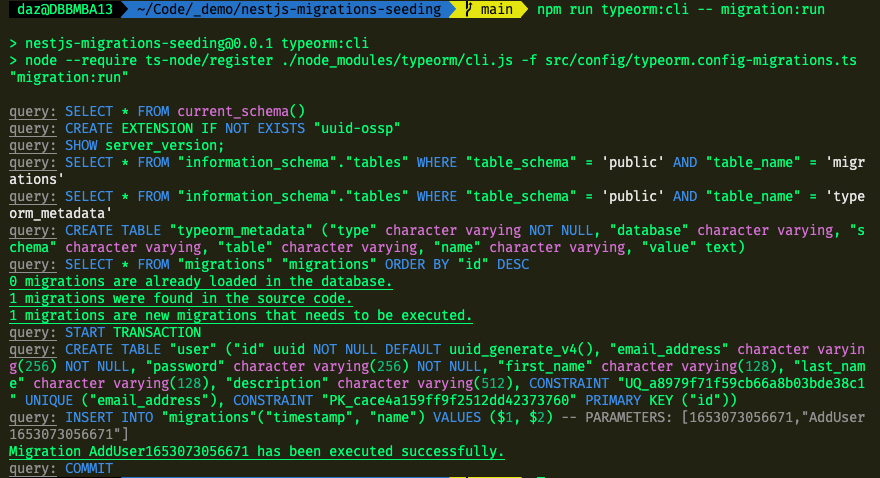
Let's run a migration to see it in action. We will be taking our database from it's initial blank schema, to one including our user table:
npm run typeorm:cli -- migration:runCommand line confirmation:
Reflected in our database:

Revert Migration
If required, we can also roll back and problematic changes to the database schema:
npm run typeorm:cli -- migration:revert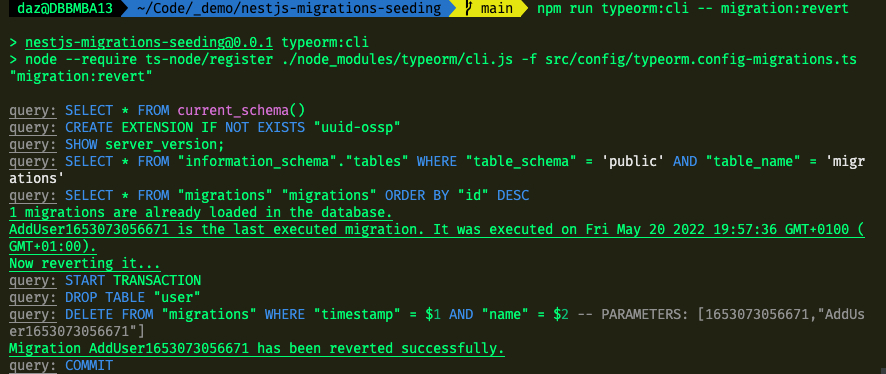
Migrations Table
In reviewing your database tables, you will see a migrations table. This is responsible for tracking an index of the stacked diffs implemented at the current moment in time.
Try running and reverting migrations to see this in effect.
Conclusion
That covers the basics to get TypeORM integrated properly into a NestJS project!
From here, you can manage your contributions and collaborations in alignment with standard git processes.
Big thanks to Amitav Roy whose YouTube channel helped me get to grips with NestJS in a practical way. Much of this post leans on his video: How to run or setup migrations in Nest JS with TypeORM.
Thanks for reading, I hope this was helpful.
If I've missed anything or you are looking for support with your NestJS project, email me at [email protected] or tweet me @dazdotdev.
References
https://docs.nestjs.com/techniques/database#migrations-1
https://www.npmjs.com/package/ts-node
https://stackoverflow.com/questions/39108476/ts-node-programmatic-usage-with-requirets-node-register
https://betterprogramming.pub/nest-js-project-with-typeorm-and-postgres-ce6b5afac3be
https://en.wikipedia.org/wiki/Object%E2%80%93relational_mapping
https://www.cloudbees.com/blog/database-migration
https://youtube.com/watch?v=1-MRmLsUrAo&ab_channel=AmitavRoy
https://docs.nestjs.com/techniques/configuration
https://github.com/motdotla/dotenv
https://github.com/typeorm/typeorm/issues/3017
https://orkhan.gitbook.io/typeorm/docs/connection-options#postgres-cockroachdb-connection-options